Tuesday, October 30, 2012

Shooting Project #3: Street Photography


PHD101
Introduction to Photography & Design
Shooting Project#3: Street Photography
Due Week 6, after Lab period

Part I:  Street Portraits
Breaking the Ice:  Photojournalists must engage, on a daily basis, with people they’ve never met before and feel comfortable photographing them and asking them questions.  Although many of their subjects are doing “newsworthy” things and may be accustomed to media attention, others are average citizens. 


Assignment Objectives:  This assignment has multiple objectives: 
·       Create portraits that convey a subject’s personality
·       Think more about visual communication and how to reveal something about your subject using photographic language (light, composition, symbolic elements in the frame).
·       Interact with subjects and collect basic caption information – who, what, when, where, why (5 Ws)
·       Confront the fear of photographing strangers and dealing with possible rejection!

For Part I of this assignment, find and approach at least 10 people you’ve never met before, explain who you are and what you’re doing, and ask to photograph them.  Make multiple portraits of each of your subjects, using the environment, quality of light, and your perspective on the subject to convey something about them.

You may want to choose a unifying theme for your portraits such as city workers or dog owners.  This isn’t necessary, but could give you an interesting essay and a good opening line to approach your subjects (“I’m doing a project on dog owners…”).

Collect caption information covering the 5 Ws by posing some basic questions to your subject.  You may choose to ask them about a current event or something specific to the environment in which you find them. 

Tips: 
·       Wear your student ID
·       approach with a partner
·       explain your intentions
·       look for receptive and friendly subjects
·       look for subjects working in public or interacting with the public
·       find one business or location and stay there
·       offer to email a portrait to your subject
·       compliment your subject, make eye contact and smile
·       take some time to converse with and engage your subject before taking out your camera

Part II: Street Scenes
Instead of approaching subjects as you did in Part I, become a silent observer and look for interesting moments of honest emotion and interaction (components of all strong photojournalistic images).  Shoot at least 50 photos of street scenes with human interest.  Watch more clips from “Everybody Street” to inspire you, or check out the work on http://www.street-photographers.com/. 

Some street photographers are confrontational, some are quiet, some find a spot and wait for the moment to come to them, and others go hunting around a location, never staying still.  Shoot in the style that feels most comfortable and genuine to you.

Tips: 
·       Don’t try to be too sneaky – if someone catches you looking, smile, make eye contact, and look non-threatening
·       Don’t be timid
·       Carry your camera as much as possible over the course of the week
·       Carry your camera at your side and raise it up only when you’re ready to shoot
·       Scout locations where there are a lot of people interacting
·       Get your camera set for the light before your start shooting
·       Don’t go too far beyond your comfort zone and stay observant of your surroundings (bring a friend or partner if it makes you feel more at ease)
·       When photographing kids, ask first if their parents are around
·       Go to an event, festival, or tourist attraction where lots of people are out with their cameras

Due Week 6:  This time, you’ll submit a contact sheet of 75-100 photos (Part I & II combined).  You’ll choose your 5 best street portraits and 5 best street scenes to resize, rename, add metadata to, and submit for critique.  For the street portraits, you’ll also be required to add the 5 Ws to your caption field in your metadata.

Grading
All shooting projects are worth 30 points and are graded according to the following criteria:
·       Image management (following assignment specifications outlined during lab period)
·       Creativity of approach to concept (effort and thought demonstrated)
·       Visual impact (use of photographic seeing, basic mastery of technique)


Blog Commentary #3: Iconic Photos

-->
Assigned in class Week 5.  You have 2 weeks to complete the comment and post your response on the blog and Webliography.  Due Week 7, by the beginning of class.

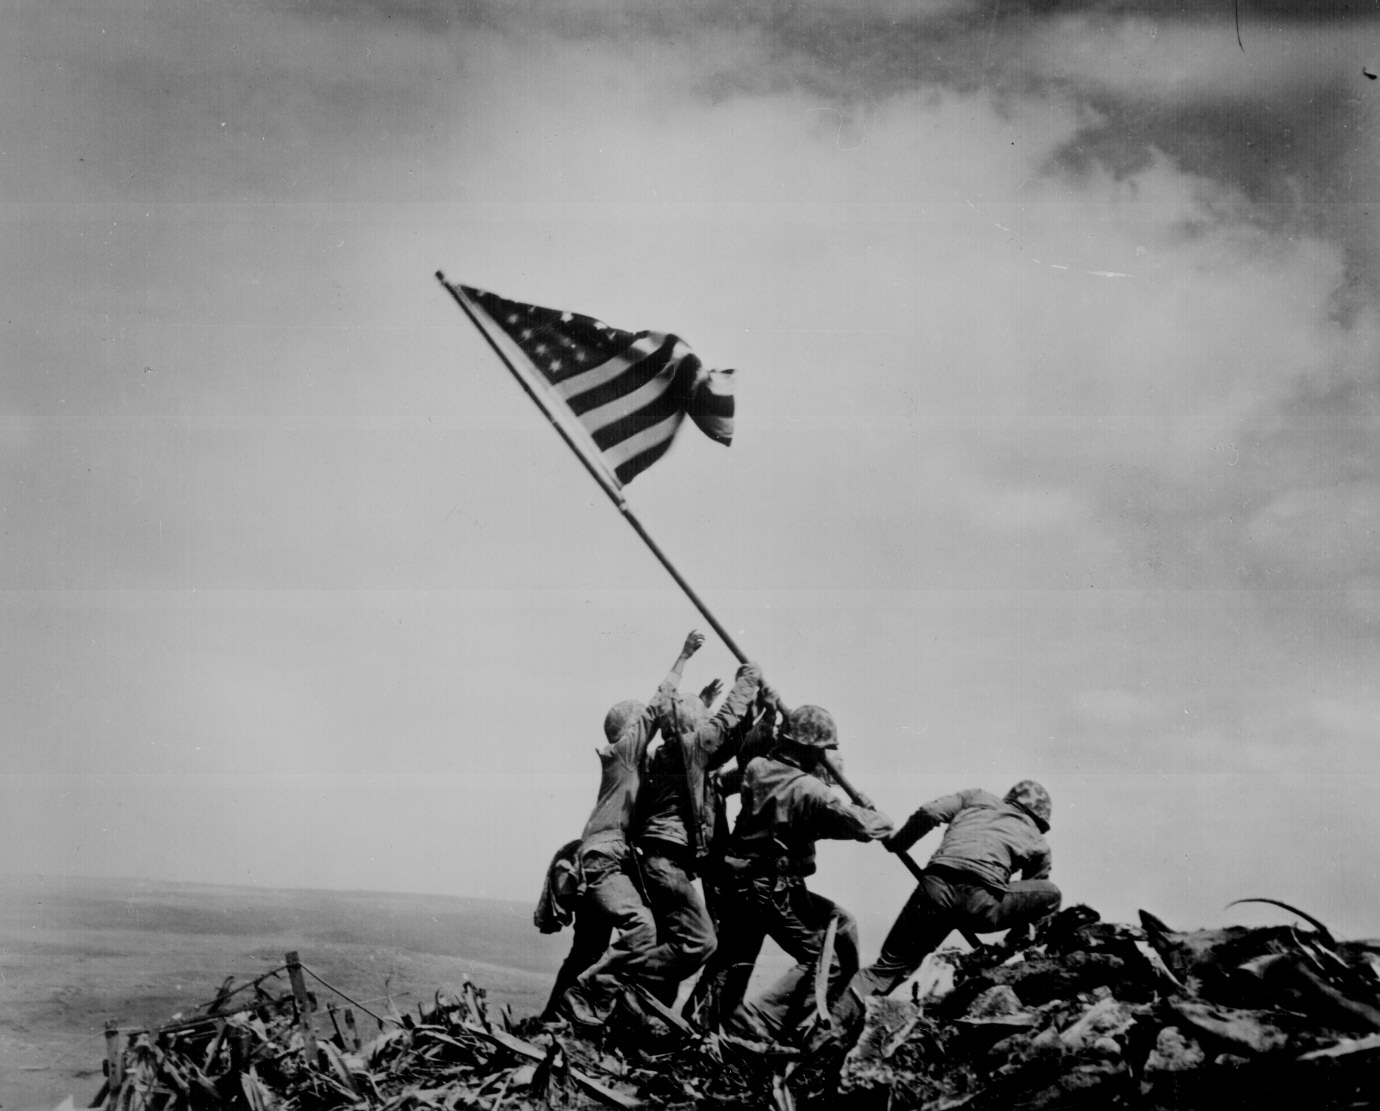
An iconic photograph is a photograph that becomes well-known and recognized in popular culture, so much so that it comes to stand in for the event that it captures.  For instance, Joe Rosenthal's Raising the Flag on Iwo Jima came to stand in for American victory in WWII:


-->

The image became, among other things, a way to sell war bonds, a postage stamp, and a bronze memorial in Washington, DC.  It also inspired this photo by Thomas Franklin of firemen at Ground Zero, which also became an iconic image of 9/11:

-->

 Choose one of the iconic photographs below to research (or find your own):

– Kevin Carter - Vulture Stalking a Child
-- Richard Drew – The Falling Man
-- Huynh Cong Ut – Napalm Strike
-- Dorothea Lange - Migrant Mother
--John Filo - Kent State Massacre 
-- Mike Wells - Famine in Karamoja
-- Lewis Hine - Breaker Boys
-- Photographer Unknown - 1968 Olympics Black Power salute
-- Edmund Hillary - Tenzing on Summit
-- Françoise Demulder - Palestinian Woman Pleads with Soldier
-- Alfred Eisenstaedt - V-J Day
-- Eddie Adams - Execution of a Viet Cong Guerrilla
-- Malcolm Browne - Burning Monk
-- Stuart Franklin -- Tank Man of Tiananmen Square
-- Photographer Unknown -- Hooded Man in Abu Ghraib

After conducting some research, post a link to the photo, along with the photographer's name (if known), and answer the following questions:

What year was it taken?

What event was it depicting?

How did people react to its publication?

How does the photographer feel about capturing the image/ sharing it with the public?

Why do you think this image has become iconic?


Tuesday, October 16, 2012

Shooting Project #2: Place


PHD101
Introduction to Photography & Design
Shooting Project#2: Place
Due Week 4, after Lab period

Many types of photographers strive to capture and convey a sense of place: editorial travel photographers, commercial photographers shooting architecture and interiors, fine art photographers who focus on the classic beauty of a landscape, or those who create conceptual project around our use (or abuse) of the environment.

What is "sense of place" and how is it conveyed photographically? To show sense of place is to capture the unique aspects of a place, its culture and its character, through composition, quality of light, and the choice of whether to include the human presence.

Conduct some research into other photographers’ techniques for conveying  a sense of place, and look at one photographer more in-depth for your blog commentary #2.

Based on your own professional or personal interest, determine which photographic approach appeals to you in conveying a sense of place.  During the course of the week, set out to make at least 50 images capturing a sense of any one place you choose (inside or outside, restaurant, building, neighborhood, home, natural space, industrial space, etc.).

Work on moving beyond the literal and making the familiar new through the way you photograph it.  Try to capture different perspectives and convey your mood and feeling about the place through the way you use composition and light.

Requirements
·       These images must be shot specifically for this assignment and previously shot photographs will not be accepted.   Make sure your date/time function in your camera menu is set properly.
·       Shoot in the exposure mode that’s comfortable to you and will yield the best results.  If you’re not comfortable shooting manually, use the program mode to get proper exposure.
·       Take care to avoid camera shake by shooting in brighter natural light so that slow shutter speeds aren’t necessary (or use a tripod in low light if you know how to do so)
·       Shoot in RAW + high fine jpeg
·       Use only available light – no flash

Submission standards
In class, we’ll review the Lightroom import/export workflow we performed for project one.  You’ll choose 5 - 10 images from the 50 that best convey sense of place and work well together to create a mini photo essay on your place.  Process & organize them through LR, and remember the following parameters:

·       Add contact info, copyright, and keywords to the IPTC metadata of all images
·       Resize to 150 ppi, 10” for the longest dimension
·       Rename as LastName_ProjectName_sequence#
·       File Format = jpeg
·       Color Space = Adobe RGB
·       Output Sharpening = Screen

In addition to the 5 – 10 selected images, submit a contact sheet of at least 50 images shot for the project (following submission instructions given in class).

Grading
All shooting projects are worth 30 points and are graded according to the following criteria:
·       Image management (following assignment specifications outlined during lab period)
·       Creativity of approach to concept (effort and thought demonstrated)
·       Visual impact (use of photographic seeing, basic mastery of technique)


Monday, October 15, 2012

Blog Commentary #2: Sense of Place

 
Assigned in class Week 3, comment by classtime Week 4 & post photographer's work to Webliography.
 
Depending on the professional or personal interest you intend to explore in your "Place" shooting project, seek out the work of either a fine art, commercial, or travel/editorial photographer, and analyze their approach to conveying sense of place in a comment on this post, as well as a posting of their website to the class Webliography.

Answer the following questions about the photographer's work:

What is the photographer's name and into what category of photography does their work fall?

What choices does the photographer make about color, composition, and quality of light in order to create a sense of place in his or her work?

What mood or feelings are evoked by their work and how do you think they are able to create that mood?

Some suggested photographers below from each category:

Travel/Editorial 
Sam Abell
David Alan Harvey
William Albert Allard
Joel Sartore
Ditte Isager
Melissa Farlow
Steve McCurry
Bob Krist
Anna Williams
Erin Kunkel

Commercial/Architectural
Brendan Austin 
Todd Eberle
Lincoln Barbour 
Jeff Amram
Julius Shulman
Hedrich Blessing Photographers (studio of 5)
Barbara Karant
Henrik Kam

Fine Art, Conceptual Landscape Photographers:
Robert Adams
Stephen Shore
Lewis Balt
Frank Gohlke
Bernd and Hilla Becher
Edward Burtynsky
Joel Sternfeld
Sally Mann
Justine Kurland

Classic Landscape Photographers:
Ansel Adams
Robert Glenn Ketchum
Art Wolfe
Roger A. Caras
Ricardo Carrasco
Norman Chaffer
Imogen Cunningham
Moose Peterson
John Pezzenti
Oliver G Pike
Eliot Porter
George Shiras III
Hannu Siitonen


Monday, October 8, 2012

Week 2 Lab: Quick Guide to Lightroom Import/Export Workflow

PHD101
Intro to Lightroom
Quick Start Guide to Import/Export Workflow


Once you’ve created your folder hierarchy on your hard drive, set Preferences, and created a
personal catalog in Lightroom, you’ll be performing the same basic workflow on all your
assignments. Here’s an abbreviated guide to your weekly LR workflow:

1. Create a new project folder on your hard drive. Create subfolders for originals and
exports for the new project.
2. Download your images to the new project originals subfolder on your hard drive.
3. Open your Lightroom Catalog from your Lightroom Catalogs folder on your hard drive.
4. Import your new images by finding the folder where they’re saved.
5. Apply During Import Before clicking the Import button, add your metadata template to
your new images (should have Creator name, Contact info, Copyright, & Copyright
Status). Add Keywords, too.
6. Rename all images for personal catalog use with YYYYMMDD_projectname_seq#.
7. Choose and Rate the best images for the assignment.
8. Filter the images so you view only them.
9. Create a Collection of the images you’ll submit and name it.
10. Sequence the images in the order you’d like to submit them.
11. Click on Export.
12. In the Export dialog, choose your project exports folder as the location to save images.
13. Rename your files for submission with Yourlastname_projectname_seq#.
14. Change File Settings: jpeg, Adobe RGB, Quality: 60.
15. Resize to Fit: Long Edge, 10 inches, 150 ppi.
16. Output Sharpening: Screen.
17. Click on Export to finalize.
18. Drag & Drop named files to PHD101 folder on Network Data Drive > Data.

***For some projects, you’ll also be creating Contact Sheets via the LR Print Module. This
will be demonstrated in class.

Quick steps:
1. Select the images to be included in the Library Module.
2. Switch to the Print module.
3. Choose a Contact Sheet Template from the list on the left Lightroom Templates
panel. Any of the Contact Sheet templates will work.
4. On the right-side panel, reset the Rows and Columns under Layout to fill the page
with your thumbnail images.
5. Under Print Job, switch from Printer to JPEG file by using the scroll-down arrow.
6. Leave all parameters at the default, except for Color Space. Change this to Adobe
RGB.
7. Click Print to File, and rename and save your contact sheet to your exports folder for
the project. Rename as Yourlastname_projectname_CS.jpg.
8. Drag & Drop contact sheet to PHD101 folder on Network Data Drive > Data

Tuesday, October 2, 2012

In-Class Exercise: Partner Portraits


PHD101: Introduction to Photography & Design

Warm-up Project: Partner Portraits
Due Week 2, after our Lightroom Lab

In class, Week 1
Interview your partner.  Find out about his/her likes and dislikes, obsessions and motivations.  Ask them about their favorite childhood memory or the environment in which they feel most at home – anything that will help you define an appropriate location, quality of light, and approach to photographing them in a way that tells the viewer something about your subject, conveying a mood or characteristic.

Using some of the information you’ve gleaned, take at least 10 distinctly different portraits of your partner.  To increase variety and creative impact of your images, consider the following elements of photographic seeing:

·       Change the location
·       Change the perspective (worm’s eye, bird’s eye, high, low)
·       Change the use of frame & subject placement (fill frame, frame through something, center, off-center, use foreground/background relationships)
·       Take at least one portrait that doesn’t show the subject’s face
·       Vary quality of light (inside, outside, window light, specular, diffused)
·       Vary the distance between photographer and subject

Return to class by the designated time to download the images you shot. 

Next Week
Bring to class all the images you shot for the project on a flash drive or external hard drive.   We’ll take the images through our import/export process in Lightroom, and you’ll work with your partner to submit paired images or diptychs of the portraits together.  We’ll present and discuss the images at the end of class next week.

Project Objective
·       Get to know your classmates
·       Practice photographic seeing
·       Learn the import/export workflow in Lightroom
·       Understand the hallmarks of personal vision in photography
·       Explore the impact of pairing and juxtaposing images

Grading
You won’t be given a grade on the content of the project, but your active engagement in the project will be assessed as part of your participation grade.


Shooting Project #1: Personal Vision


PHD101
Introduction to Photography & Design
Shooting Project#1: Personal Vision

Personal Vision is the quality that makes a photographer’s work unique; it is the “voice” of the photographer and their signature style.  When you are developing a professional portfolio, you should aspire to have it express your personal vision.  Ideally, you’ll get hired not just for your technical prowess, but for the particular way you see the world.


Part I, Due Week 2
To develop visual literacy and an understanding of the concept of personal vision, read the first blog post on the class blog.  Choose one photographer from the list provided whose work you find compelling, and respond to the post’s questions in the form of a blog comment. As an alternative to choosing a photographer on the list, you may choose a professional photographer whose work is a personal inspiration to you.

Then, add a website showcasing the photographer’s work to the class Webliography on eCompanion, selecting the category label Personal Vision. 

Part II, Due Week 3
To develop (or discover) your personal vision, think both about what you feel compelled to photograph (i.e. subject matter) and how you tend to go about photographing (photographic seeing – the way you use light, color, and composition).

Start by asking:  What do I find beautiful? What kinds of subjects do I most enjoy photographing? What do I want to express through my photography?

During the course of the project time frame, set out to make at least 50 images representing what you find beautiful.  Without overthinking it (using your gut and intuition), shoot your chosen subject matter to convey your connection with the subject to the viewer.  Experiment with light, color, and composition, working on defining your personal aesthetic or how you see the subject matter.

Requirements
·       These images must be shot specifically for this assignment and previously shot photographs will not be accepted.   Make sure your date/time function in your camera menu is set properly.
·       Shoot in the exposure mode that’s comfortable to you and will yield the best results.  If you’re not comfortable shooting manually, use the program mode to get proper exposure.
·       Take care to avoid camera shake by shooting in brighter natural light so that slow shutter speeds aren’t necessary (or use a tripod in low light if you know how to do so)
·       Shoot in RAW + high fine jpeg
·       Use only available light – no flash


Submission standards
Bring all of your images on your external hard drive or flash drive to class on the due date.  Do not resize, rename, or manipulate any files yet.  We will review Lightroom workflow, discussion submission specifications, and submit your work Week 3, after our lab session.

Grading
Part I
The first part of the project will be incorporated into your grade for Blog Comments & Posts.  Each Blog Comment or Post is worth 10 points, assessed on completion of criteria, thoughtfulness and thoroughness of analysis, and clarity of writing.

Part II
All shooting projects are worth 30 points and are graded according to the following criteria:
·       Image management (following assignment specifications outlined during lab period)
·       Creativity of approach to concept (effort and thought demonstrated)
·       Visual impact (use of photographic seeing, basic mastery of technique)


Blog Commentary #1: Personal Vision

Choose a photographer's name from the list below or select a photographer you know whose work inspires and impresses you.  Exploring online sources, look at enough work by your photographer that you get a good grasp of their personal vision.  Find one website featuring the photographer's work and add it to the class Webliography on eCompanion.

Nan Goldin -- fine art/documentary
Sally Mann -- fine art
Alec Soth -- fine art/documentary
William Eggleston -- fine art/documentary
Lauren Greenfield -- documentary/editorial
Walker Evans -- documentary
Robert Frank -- street photography/fine art
Henri Cartier-Bresson -- street photography/photojournalism
Mary Ellen Mark -- documentary
Elinor Carucci -- fine art/editorial
Ryan McGinley -- fine art/editorial
Annie Leibovitz -- editorial/portraiture
Michael Kenna -- fine art/landscape
David LaChappelle -- fashion/commercial
Dan Winters -- editorial
Irving Penn -- fashion/editorial/portraiture
Richard Avedon -- fashion/editorial/portraiture
Diane Arbus -- documentary/portraiture

Add a comment to this blog post, answering the following questions: 

What is the photographer's name?
Describe the photographer's primary subject matter.
What about his or her work do you find interesting?
How would you describe his or her visual style?